TL;DR
- Complete MPX build requires specific components: Annihilator flash hider, skeletonized pistol grip, and Steiner flashlight
- Strategic barter trades from Mechanic and Skier can save significant rubles
- Use 20-round magazines for ergonomic bonus and ensure iron sights are equipped
- 10.5-inch barrel from Peacekeeper LVL3 is essential for meeting specifications
- RK-1 foregrip with Baskak stock provides the most cost-effective combination
Games and Esports Articles
Gunsmith Part 12 presents a challenging weapon modification task requiring precise configuration of the SIG MPX submachine gun. This quest demands specific components including the Yankee Hill Annihilator flash hider and AR-15 Tactical Dynamics Skeletonized pistol grip. Historically positioned earlier in the progression chain, recent updates have shifted this assignment to Part 12, making it more accessible to mid-level players. Understanding the exact specifications is crucial for successful completion.
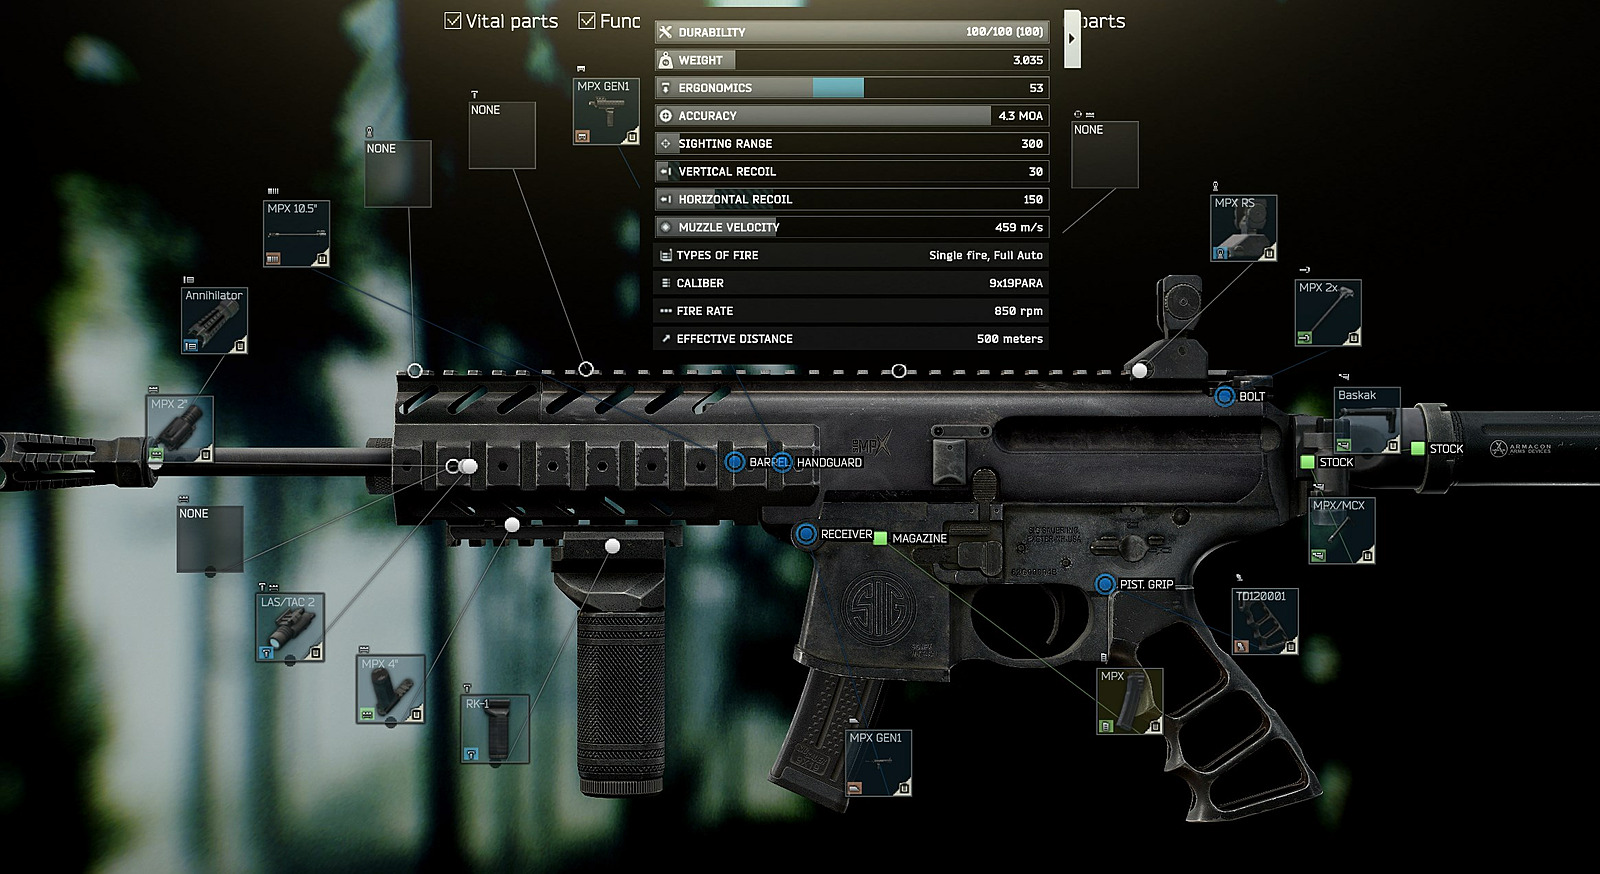
Gunsmith Part 12 MPX Build Requirements:
- Minimum 60 durability points
- 300+ meter sighting range capability
- 52 or higher ergonomics rating
- Total weight under 4 kilograms
- Cumulative recoil sum of 180 or less
- AR-15 Tactical Dynamics Skeletonized pistol grip
- Yankee Hill Annihilator flash hider
- Steiner LAS/TAC 2 flashlight
Strategic acquisition of mandatory components significantly impacts your total build cost. The Annihilator flash hider offers excellent muzzle control and can be obtained through Mechanic LVL2’s barter trade requiring a TP-200 TNT brick. This represents one of the most economical acquisition methods when available.
The Tactical Dynamics Skeletonized pistol grip provides superior ergonomic benefits but requires quest completion for direct purchase. Flea market prices typically range 70-80k rubles, though market fluctuations can increase costs dramatically. Skier LVL3 provides an alternative barter requiring an antique vase and several chainlets, offering price stability during market volatility.
For the Steiner LAS/TAC 2 flashlight, current flea market prices remain reasonable, but Mechanic LVL2’s gun barter trade provides insurance against price spikes. This exchange demands 7 G-coins for an M4 SAI build package, from which you extract the flashlight component.
Begin the assembly by replacing the standard barrel with the 10.5-inch variant available from Peacekeeper LVL3. This specific barrel length is non-negotiable for meeting the sighting range specifications while maintaining acceptable weight parameters.
Install the RK-1 foregrip purchased from Skier LVL3, followed by the appropriate stock adapter and Baskak stock combination. While alternative foregrip options exist, they typically necessitate more expensive stock configurations, making the RK-1 route the most budget-conscious approach.
Proper assembly sequence dramatically impacts final statistics. Mount components systematically, verifying each modification’s effect on your overall build metrics through the preset inspection interface.
Magazine selection proves critically important – the 20-round variant provides essential ergonomic bonuses necessary for reaching the 52+ ergonomics threshold. Many players overlook this detail and struggle to meet requirements despite correct component installation.
Always verify iron sight presence before submission, as the sighting range specification demands functional sights. Additionally, conduct final weight verification to ensure the build remains under 4 kilograms.
Common failure points include exceeding weight limits through unnecessary attachments and neglecting recoil calculations. Use the weapon preset system to test configurations before purchasing components to avoid costly mistakes.
Action Checklist
- Acquire Annihilator flash hider via Mechanic LVL2 TNT brick barter
- Obtain Skeletonized pistol grip from flea market or Skier LVL3 barter
- Secure Steiner flashlight through flea market or Mechanic LVL2 gun barter
- Purchase 10.5-inch barrel from Peacekeeper LVL3
- Assemble complete build with RK-1 foregrip and Baskak stock
No reproduction without permission:Game Guides » New Gunsmith Part 12 quest guide. How to make MPX, the cheapest build Tarkov walkthrough Complete MPX build guide for Gunsmith Part 12 with cost-saving strategies and optimization tips