TL;DR
- Start the quest by finding the Seamstress in the balloon-like house in Far Fields region
- Collect 25 Spine Cores by attacking Hoker projectiles, not the enemies themselves
- Position yourself beneath Hokers for optimal upward strikes and safer spike collection
- Use the bench inside the Seamstress’ house to respawn Hokers without losing progress
- Unlock the Drifter’s Cloak for enhanced gliding and air stream navigation capabilities
Successfully completing the “Flexile Spines” side quest in Hollow Knight: Silksong requires understanding the unique mechanics of Hoker enemies and their valuable Spine Cores. By delivering 25 of these specialized items to the Seamstress located in Far Fields, you’ll acquire a transformative mobility tool that significantly enhances your exploration capabilities throughout Pharloom.
This comprehensive walkthrough details exactly how to initiate the “Flexile Spines” mission, pinpoint Hoker locations, and efficiently gather the necessary Spine Cores. For additional navigation assistance throughout your journey, consult our detailed Silksong interactive map to optimize your route planning.
Once you’ve progressed to the Far Fields territory, situated directly east of the Deep Docks sector, continue moving eastward until encountering a vast open space featuring an enormous balloon-shaped dwelling. Enter this distinctive structure and engage in conversation with the Seamstress character to officially commence the “Flexile Spines” objective.

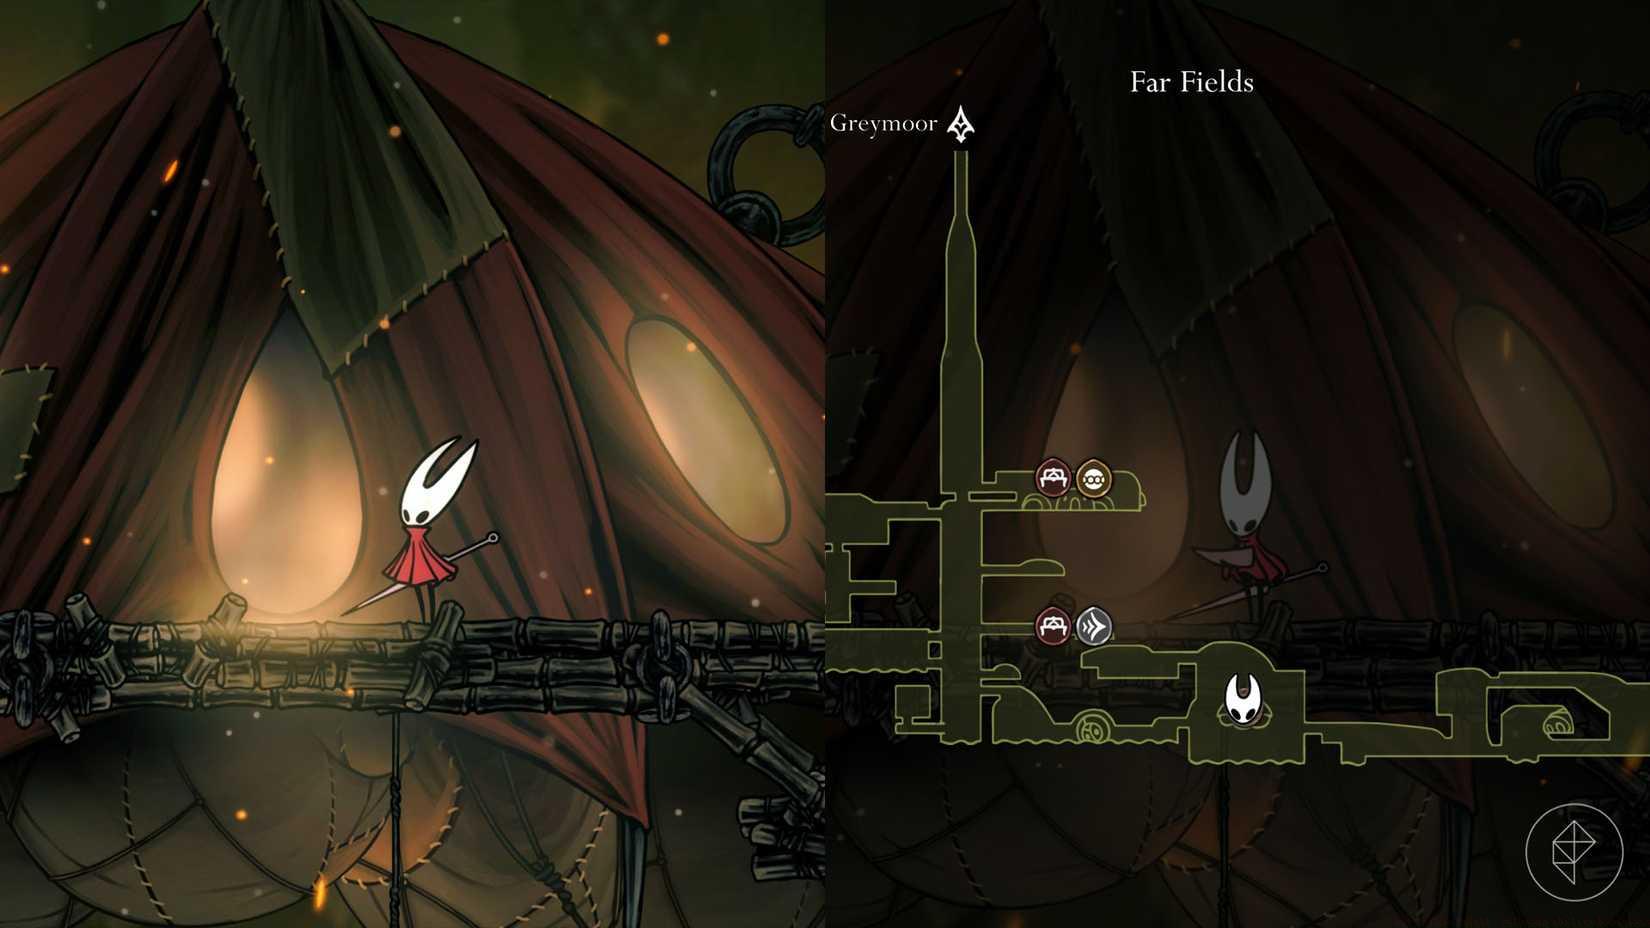
Graphic: Johnny Yu/Polygon | Source images: Team Cherry via Polygon
To fulfill the “Flexile Spines” requirements, you need to acquire 25 Spine Cores, specialized items exclusively dropped by Hoker adversaries. Fortunately, these enemies reside conveniently close to your starting point; immediately after departing the Seamstress’ residence, descend using the suspended platforms to your right, then proceed through the eastern exit as illustrated below:
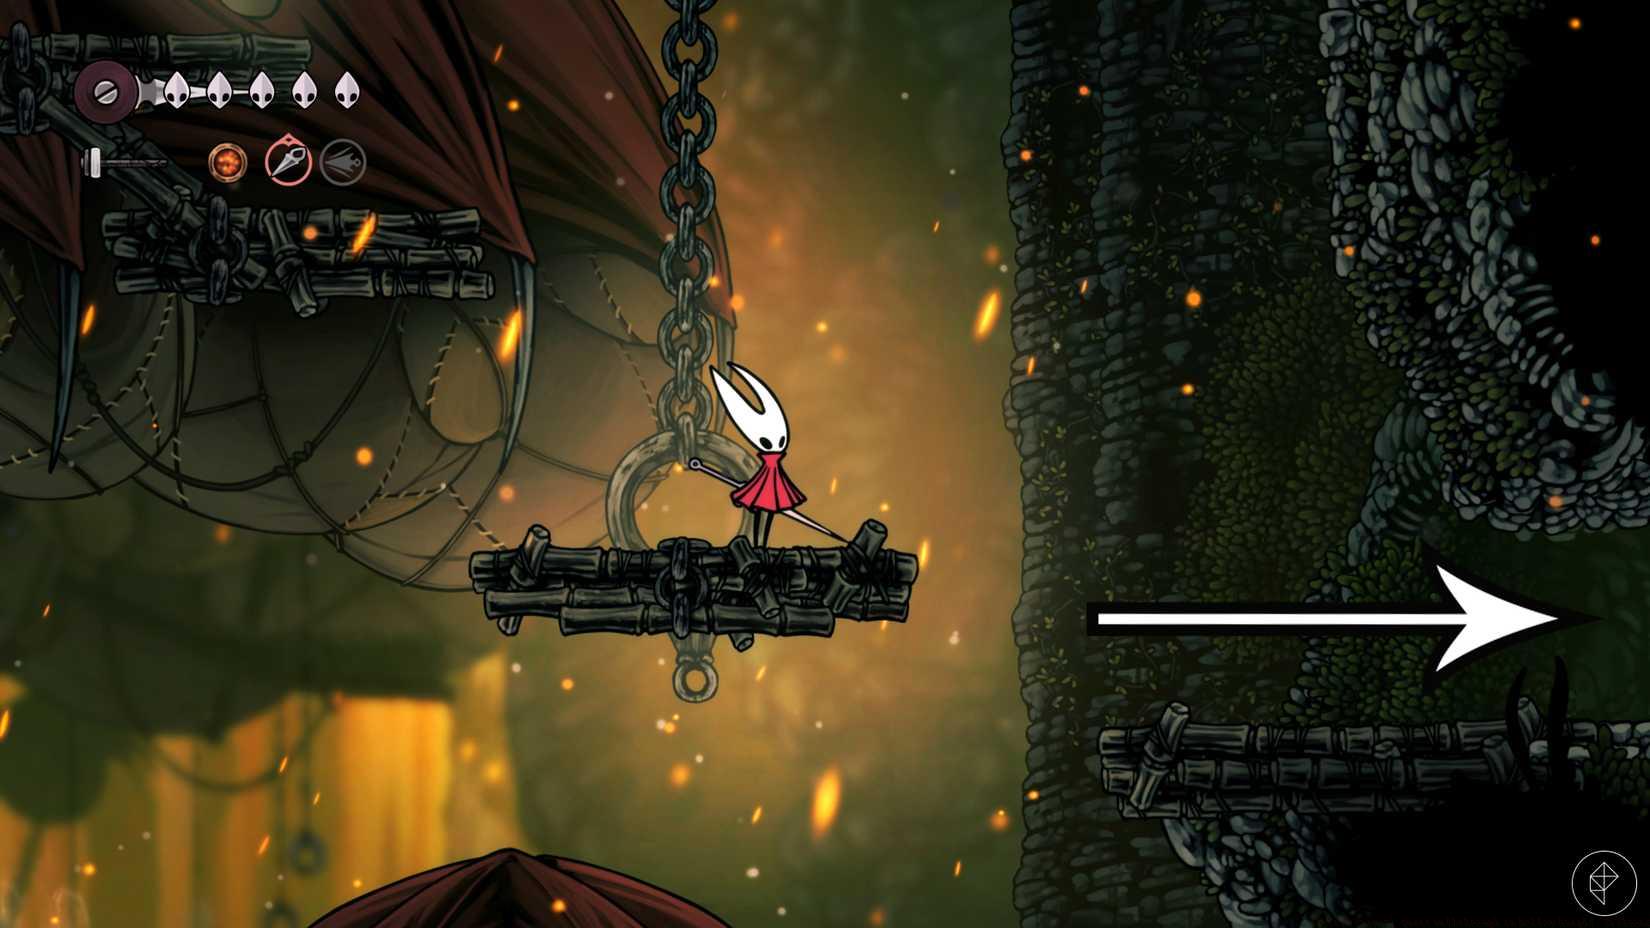
Graphic: Marloes Valentina Stella/Polygon Image: Team Cherry via Polygon
Observe the floating spiked entities inhabiting the subsequent chamber? These represent the Hokers you seek. As visible, they carry numerous sharp protrusions across their bodies, which they discharge upon receiving damage. The precise quantity and trajectory of these spikes varies each time Hokers regenerate them, consistently numbering either four or six projectiles.
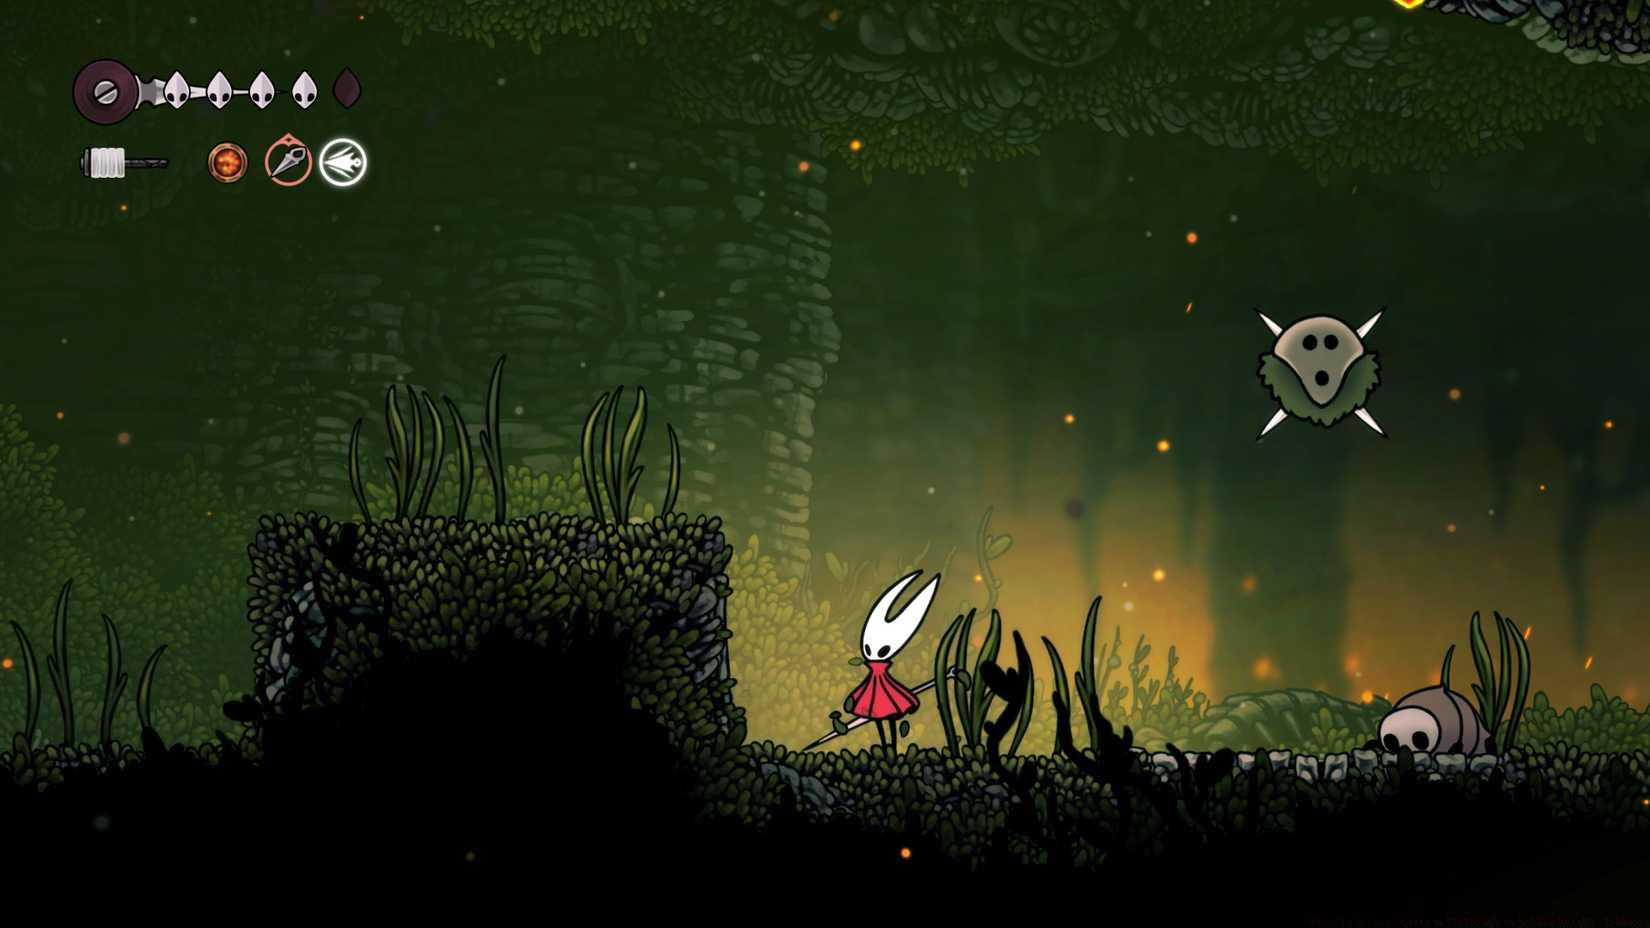
Image: Team Cherry via Polygon
The Hoker depicted above possesses four spikes and will launch them toward the upper and lower left, plus upper and lower right directions. Since one projectile typically targets Hornet’s immediate position, optimal strategy involves positioning yourself beneath this Hoker and executing upward strikes for maximum safety and efficiency.
Crucially, understand that defeating Hoker entities doesn’t automatically yield Spine Cores; instead, you must strike the spikes launched by the Hokers. Therefore, attack the Hoker, evade the projectiles, then approach all accessible spikes and strike them again to collect them as inventory items.
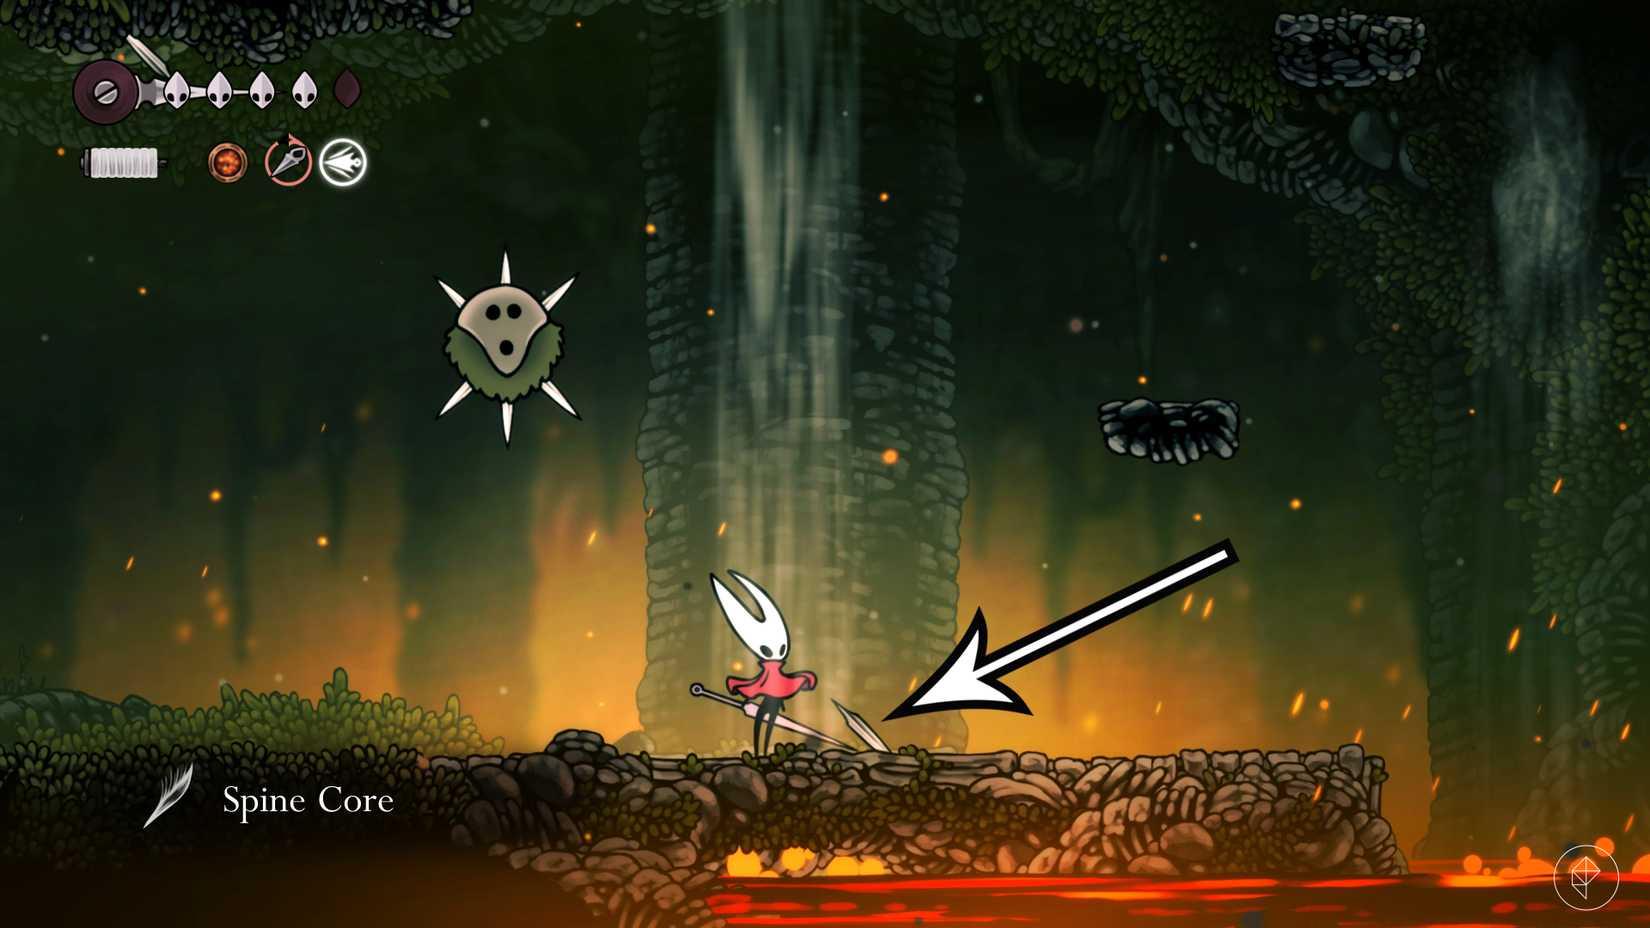
Graphic: Marloes Valentina Stella/Polygon Image: Team Cherry via Polygon
Hokers regenerate their spike projectiles following each successful hit, typically requiring approximately three strikes before defeat. After eliminating between five to seven Hokers, you should accumulate sufficient Spine Cores to complete “Flexile Spines.” Return to the Seamstress’ dwelling to submit the quest, or utilize the bench inside her home to respawn Hokers if additional farming becomes necessary.
Pro Tip: Master the timing between Hoker attacks – there’s a brief cooldown period after they fire spikes where you can safely approach. Advanced players can utilize Hornet’s dash ability to quickly close distance to fallen spikes before they disappear.
Common Mistake Alert: Many players waste time attacking Hokers from unsafe angles. Always approach from below when possible, as this minimizes exposure to their projectile patterns. Additionally, don’t forget that spikes have a limited duration on the ground – collect them within 5-7 seconds or they’ll vanish.
Efficiency Optimization: For speedrunners or players seeking to minimize farming time, focus on Hokers with four spikes rather than six. The four-spike variants have more predictable patterns and require less movement to collect all projectiles, resulting in faster Spine Core accumulation per encounter.
Resource Management: The bench inside the Seamstress’ house serves as both a respawn point for Hokers and a safe healing location. Use this to your advantage by resting between farming sessions to maintain optimal health without losing progress on your Spine Core count.
Upon successful completion of “Flexile Spines,” the Seamstress rewards you with the Drifter’s Cloak, a game-changing equipment piece that enables gliding during jumps and navigation of air currents. Activate this ability by holding the jump button while airborne. When combined with the Swift Step sprinting and dashing capabilities, the Drifter’s Cloak dramatically improves horizontal traversal range and exploration potential.
Advanced Movement Synergy: The true power of Drifter’s Cloak emerges when chained with other movement abilities. Try executing a dash followed immediately by a glide to cover enormous distances. This technique proves particularly valuable for reaching previously inaccessible platforms and discovering hidden areas throughout Pharloom.
Exploration Applications: Beyond mere mobility enhancement, the cloak enables access to numerous secret areas containing additional collectibles, lore fragments, and valuable resources. Areas with strong upward air currents become navigational highways when combined with the gliding function.
Combat Integration: Skilled players can incorporate the Drifter’s Cloak into combat scenarios, using the extended air time to position themselves advantageously against aerial enemies or to evade ground-based attacks while maintaining offensive pressure.
Seeking additional Silksong guidance? Explore our essential beginner strategies and premium rosary bead farming spots if you’re commencing your adventure, and if you’re encountering secured barriers, our straightforward key locations reference provides the solutions you need. For comprehensive gameplay mastery, consult our Complete Guide to advanced techniques.
Action Checklist
- Navigate to Far Fields and locate the balloon-shaped house to speak with the Seamstress
- Descend right-side platforms and enter eastern chamber to find Hoker enemies
- Position beneath Hokers and use upward strikes while avoiding projectile patterns
- Collect Spine Cores by attacking launched spikes before they disappear
- Use Seamstress’ bench to respawn Hokers if needing additional Spine Cores
- Return to Seamstress with 25 Spine Cores to receive Drifter’s Cloak reward
- Practice gliding mechanics and combine with other movement abilities
No reproduction without permission:Game Guides » ‘Flexile Spines’ quest walkthrough in Hollow Knight: Silksong Complete guide to finding Hokers, collecting Spine Cores, and unlocking the Drifter's Cloak in Hollow Knight: Silksong