TL;DR
- Complete 38 challenges achievable with dedicated playtime and strategic planning
- Focus on league mechanic mastery for multiple challenge completions simultaneously
- Utilize Atlas passive tree and scarabs to target specific league mechanics efficiently
- Advanced boss fights require specific mechanics knowledge and build preparation
- Time-saving strategies include bulk purchasing and carry services for difficult content
Games and Esports Articles
Path of Exile’s 3.20 expansion, The Forbidden Sanctum, introduces a comprehensive challenge system with 40 total objectives. Unlike previous leagues where 40/40 completion demanded extreme dedication, this iteration offers more accessible progression with 38 challenges realistically attainable through consistent gameplay. Our expert analysis provides strategic insights to maximize your efficiency while pursuing these objectives and securing the exclusive rewards.
Key Insight: Many challenges overlap significantly, allowing you to progress multiple objectives simultaneously with proper planning. The key to efficient completion lies in understanding which challenges naturally complement each other during your mapping sessions.
Learning the Ropes
Complete each of the following foundational tasks to establish your challenge progression baseline.
- Use an Orb of Transmutation
- Buy an item with at least 3 linked sockets from a vendor
- Fully clear the Fetid Pool
These introductory objectives guide new players through essential game mechanics while providing veteran players quick early progression. The Orb of Transmutation transforms a normal item into a magic item, typically used within the first hour of gameplay. For the 3-linked socket purchase, check multiple Act vendors as inventory refreshes with character level progression. Returning to Act 1 for Fetid Pool completion is often overlooked—mark this area on your waypoint for efficient backtracking.
Vendor Knows Best I
Master these fundamental vendor recipes to receive each specified item type.
- Hybrid Flask
- Onyx Amulet
- Jeweller’s Orb
- Orb of Chance
Vendor recipes provide essential crafting components and currency items. The Hybrid Flask recipe combines mana and life flasks of the same type. Onyx Amulet requires a amulet with specific stat requirements. These recipes form the foundation of Path of Exile’s crafting economy and should be mastered early.
Defeat Act Bosses I
Systematically complete each campaign encounter to build your challenge count.
- Act 1: Merveil, the Twisted
- Act 2: Vaal Oversoul
- Act 3: Dominus, Ascendant
- Act 4: Malachai, The Nightmare
- Act 5: Kitava, the Insatiable
Pro Tip: Many players encounter completion tracking issues with act bosses. Always remain in the boss arena until the achievement notification appears. If completion doesn’t register, use the command /recheck_achievements to force update your progress. This command also resolves other challenge tracking discrepancies.
Rediscovered Past
Complete each specified encounter within The Forbidden Sanctum league mechanic.
- Complete a room in the Forbidden Sanctum
- Complete a room while you have a Boon active
- Complete a room while affected by an Affliction
- Unlock the Relic Altar
The Forbidden Sanctum introduces a rogue-like dungeon system with persistent consequences. Boons represent positive modifiers that enhance your Sanctum run, while Afflictions introduce challenging penalties. To initiate the league content, locate Divinia in Act 2 towns and discover the Sanctum entrance within Fellshrine Ruins. Your initial descent automatically unlocks the relic system, providing permanent bonuses across future Sanctum attempts.
Secretive Sepulchre
Advance your Sanctum proficiency by completing these intermediate league encounters.
- Complete a floor in the Forbidden Sanctum
- Purchase a Boon from Divinia
- Activate a Fountain
- Make an Accursed Pact
Floor completion requires defeating the first floor boss Varakath. Position yourself mid-range during this encounter—staying too distant makes dodging his flamethrower attack difficult, while positioning too close exposes you to his burning ground effect. Merchant rooms require sufficient Aureus coin reserves, typically ranging from 300-600 currency units depending on boon rarity and modifiers.
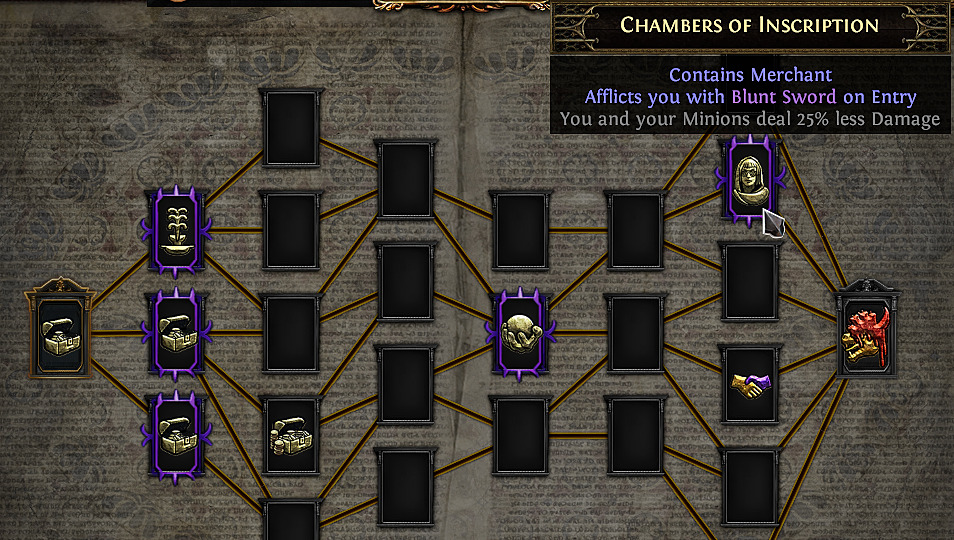
Common Mistake: Players frequently underestimate Aureus coin requirements for merchant interactions. Always maintain a reserve of 500+ coins when entering Sanctum floors to capitalize on merchant opportunities.
Dangerous Errands
Complete these encounter types that appear throughout both campaign and endgame mapping.
- Kill an Essence Monster
- Activate a Shrine
- Complete a Vaal Side Area
- Complete an Abyss
While these encounters can appear during the campaign, they’re more efficiently completed during mapping phases. Utilize targeted strategies: Abyss encounters benefit from scarab usage, Shrines can be guaranteed using the “Domination” mod on your map device for 3 Chaos Orbs, Vaal Side Areas open when using Sacrifice fragments in map device slots, and Essences have dedicated Atlas passives for consistent spawn rates.

Defeat Act Bosses II
Continue your campaign progression by defeating these later act bosses.
- Act 6: Tsoagoth, The Brine King
- Act 7: Arakaali, Spinner of Shadows
- Act 8: Lunaris, Eternal Moon and Solaris, Eternal Sun
- Act 9: The Depraved Trinity
- Act 10: Kitava, the Insatiable
Critical Timing: The Act 7 boss requires particular attention—you must wait in the arena after victory until completion registers. The /recheck_achievements command resolves most tracking issues across all challenge categories.
Atziri Calls
Defeat Atziri, Queen of the Vaal within The Apex of Sacrifice.
Access this iconic encounter by placing four Sacrifice fragments in specific arrangement within your map device. This opens portals to a three-floor area culminating in the Atziri boss fight. Capable mapping characters typically handle this encounter without significant difficulty.
The most technically demanding aspect involves her reflection mechanic. During her split phase, four copies appear with one holding a mirror—this specific copy reflects all damage dealt to it, potentially causing instant character death. Strategic targeting eliminates this threat since only one copy requires elimination to progress the encounter.
Complete Anarchy Encounters
Systematically complete these Rogue Exile objectives.
- Kill 60 Rogue Exiles
- Kill a Rogue Exile while affected by a Shrine
- Kill 3 Rogue Exiles within 10 seconds
- Kill a Rogue Exile while Delirious
Rogue Exiles appear randomly during mapping. Enhance spawn rates through map modifiers, device options, sextant applications, or Atlas passive tree investments.
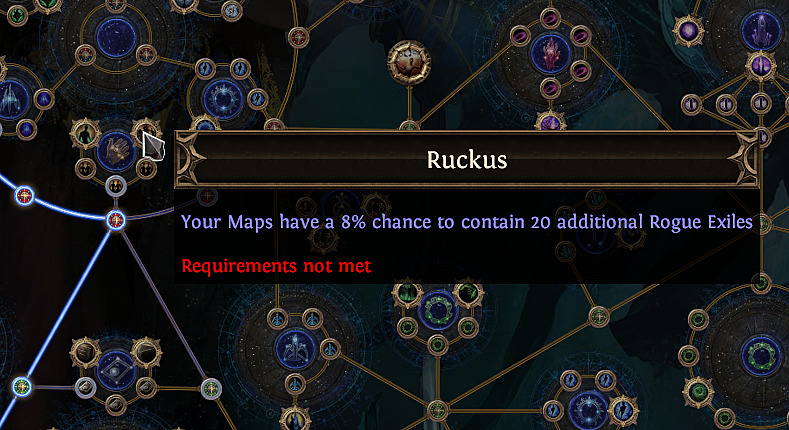
Execution Strategy: The triple exile elimination within 10 seconds presents the most demanding requirement. For efficient completion, run compact white and yellow tier maps after allocating the Ruckus notable on your Atlas passive tree. This combination typically yields rapid completion through concentrated exile spawn clusters.
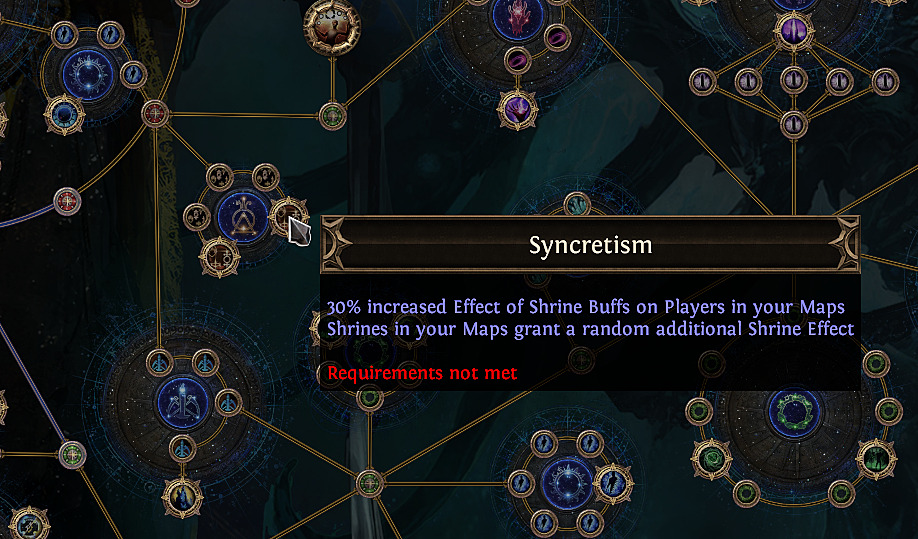
Complete Domination Encounters
Master these Shrine-based encounter objectives.
- Activate 90 Shrines
- Kill a Map Boss while shrine-buffed
- Activate a Divine Shrine
- Maintain 4 different shrine effects simultaneously
Shrine availability extends across map device options and Atlas passive tree investments. Divine Shrine discovery relies on RNG mechanics. The simultaneous shrine effect challenge optimally utilizes the Syncretism Atlas notable for reliable completion.
Complete Beyond Encounters
Execute these Beyond league mechanic objectives systematically.
- Defeat 100 Rare Beyond Monsters
- Utilize Tainted Currency items
- Defeat a Beyond Boss while shrine-enhanced
- Defeat a Beyond Boss while under Delirium effects
Beyond mechanics activate through map device usage. Defeating regular monsters spawns additional Beyond enemies with chances to drop Tainted currency—specialized crafting items that exclusively function on corrupted equipment. Sustained elimination eventually spawns Beyond bosses.
Advanced Tactic: For the shrine-affected Beyond boss elimination, locate but don’t activate shrines initially. Progress through map clearing until boss spawns, then strategically activate shrine before delivering final blow.
Punishing Pinnacle Pressure
Execute any five pinnacle boss encounters under these specified conditions.
- Cortex without Wormhole Slam contact
- Eater of Worlds with 5+ Inescapable Doom successes
- Maven while affected by Maven’s Punishment
- Shaper with 15+ active Volatile Anomalies
- Sirus while standing in Desolation of the Awakener
- The Searing Exarch while affected by Searing Rune effects
- Uber Elder with Vortex ground and Eldritch Decay active
This represents one of the most demanding challenge categories. Specific conditions introduce substantial mechanical complexity, while boss access carries significant economic investment requirements.
Mechanical Breakdown: The Wormhole Slam represents a two-phase attack sequence from the final Cortex boss, Synthete Masterpiece. Initial black orbs teleport you forward unavoidably, but the subsequent slam requires precise movement skill timing for evasion. The attack initiation phrase “Feel the pull of the void” provides critical audio cue timing.
Inescapable Doom occurs during sphere energization phases while avoiding expanding laser AoE. Maven’s Punishment disables life regeneration and recovery mechanisms—acquire by contacting rotating lasers during final phase immediately before delivering killing blow.
Volatile Anomalies manifest as pursuing black spheres that generate Vortex effects upon contact. Strategic arena positioning minimizes pursuit angles while maintaining boss damage output.
Strategic Selection: Given the requirement for only five completions, prioritize Cortex, Searing Exarch, Eater of Worlds, Maven, and Sirus encounters. The Shaper and Uber Elder variants introduce additional complexity with higher failure costs.
Grinding Grand Goals
Complete any four of these extensive encounter categories the specified number of times.
- Reach level 100
- Open 400 Labyrinth treasure chests
- Complete 50 high-level Sanctum floors
- Execute 250 Red Tier Master Missions
- Defeat 100 Guardian map bosses
- Eliminate 100 Pantheon-modified rare monsters
This league’s final challenge category offers unusual accessibility compared to previous iterations. The Master mission and rare monster objectives naturally complete through standard mapping activities. Select two additional objectives—50 Sanctum floors proves manageable since floor specification doesn’t exist, enabling first floor repetition strategies. Guardian map completion benefits from Atlas passive tree investments and bulk purchasing strategies.
Pro Tip: Kirac missions contribute to Master mission totals, making report farming a valuable efficiency strategy.

Games and Esports Articles
The Forbidden Sanctum Challenge Guide: Path of Exile 3.20 40/40 Analysis
With the release of The Forbidden Sanctum league in Path of Exile, developers have introduced a comprehensive set of 40 challenges with corresponding cosmetic rewards. This iteration presents one of the more accessible challenge sets in recent memory, with 38 completions realistically achievable through dedicated gameplay. Our comprehensive guide delivers actionable strategies to efficiently complete the majority of these challenges while maximizing your reward acquisition.
Learning the Ropes
Successfully accomplish each of these fundamental tasks to establish your foundation.
- Utilize an Orb of Transmutation on any item
- Purchase equipment with minimum three connected sockets from any vendor
- Completely clear the Fetid Pool area in Act 1
This straightforward introductory challenge ensures you grasp basic game mechanics. Many players overlook returning to Act 1 for Fetid Pool completion – set a waypoint before proceeding to avoid backtracking. If struggling to locate 3-linked vendor items, systematically check all act vendors as their inventories refresh with level progression.
Rediscovered Past
Complete each of these initial Sanctum encounters to understand the league’s core systems.
- Finish any room within the Forbidden Sanctum
- Complete a Sanctum room while benefiting from a Boon effect
- Complete a Sanctum room while suffering from an Affliction debuff
- Unlock the Relic Altar functionality
This foundational challenge introduces the league’s core risk-reward dynamic. Boons represent temporary beneficial modifiers, while Afflictions apply persistent negative effects throughout your run. To access the Relic Altar, locate Divinia in Act 2’s town area and discover the Sanctum entrance within Fellshrine Ruins. Progressing through this initial encounter permanently unlocks your relic inventory system.
How to unlock Templar Relics and Accursed Pacts in Forbidden Sanctum PoE 3.20
Complete Beyond Encounters
Accomplish each of these specialized Beyond encounters to master this returning league mechanic.
- Eliminate 100 Rare Beyond Monsters
- Apply a Tainted Currency item
- Defeat a Beyond Boss while shrine-buffed
- Defeat a Beyond Boss while Delirium-fog affected
Beyond content becomes accessible through your map device. When defeating regular monsters in Beyond-enabled maps, additional enemies spawn with chances to drop specialized Tainted currency, which exclusively modifies already-corrupted items. Accumulating sufficient Beyond monster kills triggers boss spawns. For the shrine-assisted boss kill, locate but don’t activate shrines initially. Clear your map systematically, then when boss spawning becomes imminent, weaken it significantly, return to your pre-located shrine, activate the buff, and secure the kill. Pro tip: Use the “Domination” map device mod for guaranteed shrine spawns.
Unearthed Sanctuaries
Successfully complete one instance from each of these Sanctum room categories.
- Abandoned Library, Decrepit Cellar, Halls of Worship or Undercroft (navigation objective)
- Candlelit Chapel, Experimentation Chamber, Hall of Mirrors or Sanctum Sanctorum (floor boss encounters)
- Chambers of Inscription, Derelict Caverns, Unholy Lair or Lost Catacombs (guard elimination rooms)
- Holy Trials, Gauntlet, Crucible or Entombment (exit location challenges)
- Scriptorium, Reliquary, Sanctum Bellum or Necropolis (miniboss engagements)
- Templar Annals, Battleground, Infernum or Desecrated Crypts (trap arena scenarios)
These diverse room types naturally complete through regular Sanctum participation. Simply engage with rooms encountered during mapping sessions. Room types display when hovering over them on your Sanctum floor interface.
Complete Breach Encounters
Achieve completion for each of these Breach-specific encounters.
- Open 20 Breachlord’s Clasped Hands containers
- Upgrade any Breach unique item
- Complete either a Pure or Flawless Breachstone
Optimal Breach sources include dedicated map device mods and specialized Scarabs. Breachlord’s Clasped Hands represent the substantial splinter caches occasionally available when Breach encounters activate.
Pure Breachstones creation involves upgrading standard stones using It That Fled’s Syndicate crafting bench. Alternative acquisition method utilizes corresponding blessings for stone upgrades. Flawless variants exclusively drop from Maven’s Invitation: The Hidden. Successfully running these demands powerful character builds – inadequate damage output will prove fatal, so either prepare thoroughly or utilize carry services. Critical mistake to avoid: Attempting Flawless Breachstones without proper preparation wastes significant currency investment.
Breach uniques constitute the specialized items droppable from Breach bosses. Upgrading these requires their specific corresponding blessings.
- Tul: The Halcyon, The Snowblind, Grace Tulborn
- Xoph: Xoph’s Inception, The Formless Flame, Xoph’s Heart
- Esh: Esh’s Mirror, Hand of Thought and Motion, Voice of the Storm
- Uul-Netol: Uul-Netol’s Kiss, The Infinite Pursuit, The Anticipation
- Varakath, the Waxen – avoid flamethrower contact completely
- Braom, the First Experiment and Uzar, the Second Experiment – eliminate one while its partner maintains 50%+ health
- Xenathar, Templar Reaper – evade all laser attacks
- Lycia, The Unholy Heretic – avoid Enervation ground effects
- Target farm specific components rather than relying on random acquisition
- Utilize Atlas passive tree notables to target specific mechanics
- Plan boss encounters during favorable map conditions and character readiness states
- Use an Orb of Transmutation
- Purchase vendor items with minimum 3-linked sockets
- Full clearance of Fetid Pool in Act 1
These introductory objectives teach core game mechanics while providing early progression. Many new players overlook returning to Act 1 areas, so set a reminder to complete Fetid Pool after reaching later acts.
Rediscovered Past
Master the league mechanic through these sequential encounters:
- Complete any Sanctum room
- Finish rooms while benefiting from Boons (positive modifiers)
- Survive rooms while hampered by Afflictions (negative effects)
- Unlock the Relic Altar functionality
Common Mistake: Players often miss Divinia in Act 2 town, which is essential for unlocking relics. Locate her after reaching Fellshrine Ruins to activate this crucial system.
How to unlock Templar Relics and Accursed Pacts in Forbidden Sanctum PoE 3.20
Secretive Sepulchre
Advance through these league-specific objectives:
- Complete an entire Sanctum floor
- Purchase Boons from Divinia using Aureus coins
- Activate Fountain restoration points
- Accept strategic Accursed Pacts for calculated risk-reward scenarios
The first floor boss Varakath presents a positioning challenge. Maintain medium distance to avoid his flamethrower attack while evading the burning ground he generates. Merchant rooms typically require 300-600 Aureus coins for Boon purchases.
This is how Merchant room reward looks. Accursed pact is below. Pious Pacts
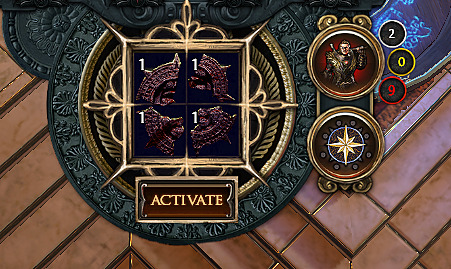
Complete a Sanctum floor while simultaneously affected by three major-impact Accursed Pacts:
- Apex Pact (50% reduced Resolve loss in Boss Rooms, doubled in non-Boss Rooms)
- Austerity Pact (50% Merchant discount but no coin drops)
- Doubling Pact (Twinned guard encounters)
- Indomitable Pact (30 Inspiration per room start but resets each room)
- Pyrrhic Pact (Doubled Resolve recovery but maximum reduced by 50% of recovered amount)
Advanced Strategy: While most Accursed Pacts offer resource exchanges, these four provide game-changing effects that require strategic adaptation.
Critical Warning: Prioritize Pact collection early in runs, as their cumulative effects can be managed with proper room selection and combat approach.
Definitive Deviation
Complete a Sanctum floor while affected by 17 specific Afflictions or Boons. This represents one of the most demanding challenges in the set.
Boons:
- All-Seeing Eye (Full Sanctum Map revelation)
- Bronze Coin & Descry variants (Resolve recovery mechanics)
- Crystal Chalice (Minor Affliction immunity)
- Gold Coin (Aureus coin doubling)
- Holy Descry (Full Resolve recovery at zero with penalties)
- Imperial Seal (Trap deactivation)
- Silver variants (Coin gain on Resolve loss and hit protection)
Afflictions:
- Anomaly Attractor (Volatile Anomaly spawning)
- Chiselled Stone (Monster petrification on hit)
- Cutpurse & Death Toll (Coin acquisition blocking)
- Demonic Skull (Resolve recovery prevention)
- Glass Shard (Boon conversion to Affliction)
- Orb of Negation (Relic effect nullification)
- Unassuming Brick (Boon acquisition blocking)
- Veiled Sight (Map concealment)
Time Investment: Expect 8-12 hours of dedicated Sanctum runs for this challenge alone.
Punishing Pinnacle Pressure
Complete five Pinnacle boss encounters under specific conditional requirements:
- Cortex: Avoid Wormhole Slam teleportation into devastating attack
- Eater of Worlds: Complete 5+ Inescapable Doom phases successfully
- Maven: Survive while affected by Maven’s Punishment debuff
- Shaper: Manage 15+ active Volatile Anomalies
- Sirus: Endure Desolation of the Awakener ground effects
- Searing Exarch: Withstand Searing Rune tile damage
- Uber Elder: Navigate Vortex ground while affected by Eldritch Decay
Pro Selection: Prioritize Cortex, Searing Exarch, Eater of Worlds, Maven, and Sirus for optimal difficulty balance.
Efficiency Framework: Group challenges by league mechanic and complete them during focused farming sessions. Utilize Atlas passive tree specialization to maximize encounter frequency for targeted objectives.
Build Considerations: Totem, minion, or ranged builds significantly simplify conditional boss challenges by reducing exposure to dangerous mechanics.
Common Pitfall: Attempting the 17 Affliction/Boon challenge without proper relic setup often results in repeated failures. Ensure you have inspiration-generating relics before attempting this demanding objective.
Resource Allocation: For trade league players, consider purchasing carry services for the most challenging encounters like The Feared and The Hidden invitations.
Advanced Tip: For the 50 Sanctum floors challenge, farm the first floor repeatedly in low-tier maps to minimize difficulty while maximizing completion rate.
Games and Esports Articles
The Forbidden Sanctum challenge guide completion Path of Exile. PoE 3.20 40/40 challenges analysis
With the arrival of The Forbidden Sanctum expansion in Path of Exile, Grinding Gear Games has introduced a comprehensive set of 40 challenges with exclusive cosmetic rewards. This league’s challenge structure is notably more accessible than previous iterations, with 38 challenges being realistically achievable through dedicated gameplay. Our expert analysis provides strategic insights to optimize your challenge completion efficiency.
Pro Tip: Begin tracking challenge progress early in your league start to identify which objectives will complete naturally versus those requiring focused effort.
Learning the Ropes
Master these fundamental game mechanics to build a solid foundation for more complex challenges ahead.
- Use an Orb of Transmutation
- Buy an item with at least 3 linked sockets from a vendor
- Fully clear the Fetid Pool
This straightforward introductory challenge covers essential early-game actions. Many players forget to return to Act 1 to complete Fetid Pool after progressing further in the campaign. If struggling to find 3-linked items, systematically check all Act vendors as inventory refreshes with campaign progression.
Rediscovered Past
Delve into the core league mechanics through these progressive encounters.
- Complete a room in the Forbidden Sanctum
- Complete a room in the Forbidden Sanctum while you have a Boon
- Complete a room in the Forbidden Sanctum while you have an Affliction
- Unlock the Relic Altar
This foundational challenge introduces you to Sanctum mechanics. Boons provide temporary beneficial effects, while Afflictions impose persistent negative modifiers throughout your run. To access the Relic Altar, locate Divinia in Act 2 town and discover the Sanctum entrance in Fellshrine Ruins. Upon descending, you’ll unlock the relic system that provides persistent bonuses across multiple Sanctum attempts.
Common Mistake: Players often rush through rooms without properly managing their Resolve resource, leading to premature run failures.
Temporal Detour
Complete each of the following Incursion encounters.
- Complete 30 Red Tier Alva Master Missions
- Upgrade 50 Incursion Temple rooms to Tier 3
- Complete 20 Temples of Atzoatl
- Defeat the Omnitect while it is augmented by at least two Tier 3 rooms in an area of level 83
The Incursion circle on the Atlas passive tree significantly accelerates progress on these objectives. Plan your temple layouts strategically to maximize Tier 3 room conversions.
Optimization Strategy: Focus on specific room types that provide combat advantages rather than scattered upgrades.

An augmented Omnitect means the boss fight occurs with active benefits from rooms like these:
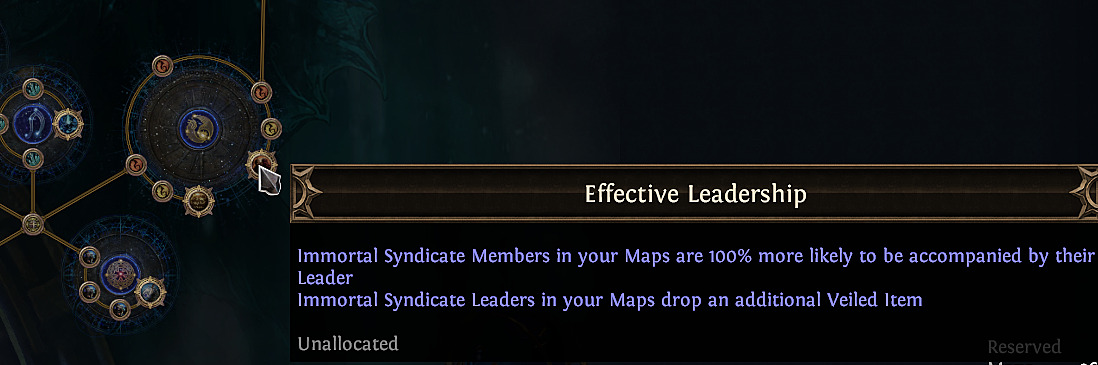
Suspicious Syndicates
Complete each of the following Betrayal encounters.
- Complete 30 Red Tier Jun Master Missions
- Complete 30 Syndicate Safehouses
- Execute 100 Syndicate Members
- Defeat the Mastermind in an area of level 83
Accessing the Mastermind requires completing sufficient Safehouses to gather intelligence. Like other masters, the Atlas passive tree dramatically improves mission sustainability and increases member spawn rates in encounters.
Monster Massacre
Kill 1,000,000 monsters in areas that are level 68 or higher.
This mapping-intensive challenge naturally progresses while completing other Atlas objectives. Efficient clear speed builds can complete this challenge within 150-200 hours of focused mapping.
Reoccurring Reminiscent Realms
Complete 25 Atlas Memory Maps that have at least 100% Item Quantity and are Tier 14 or higher.
Atlas Memories, introduced in patch 3.19, modify specific league mechanics while amplifying map modifiers. Each memory provides 4 maps, meaning you need at least 9 complete memories. Currently, the most cost-effective options include certain Alva and Kirac memories available through the game’s economy.
Orthodox Origins
Complete each of the following encounters.
- Fully unlock the Relic Altar
- Complete the Forbidden Sanctum with no Relics in an area of level 81 or higher
- Complete the Forbidden Sanctum with no Boons in an area of level 81 or higher
- Complete the Forbidden Sanctum while you have at least 15 Afflictions in an area of level 81 or higher
This represents one of the most demanding challenges in the set. Accumulating 15 Afflictions requires gaining negative modifiers in nearly every other room, presenting significant difficulty.
Advanced Strategy: The optimal approach involves securing a Boon that grants Inspiration whenever you acquire an Affliction, combined with Afflictions that trigger additional negative effects from specific actions—such as utilizing fountains.
Time Estimate: Expect to dedicate 15-25 hours specifically to this challenge if attempting without optimal relic setup.
Don’t hesitate to restart if you encounter an unfavorable beginning to your run. Certain unique relics that increase difficulty can be strategically employed, potentially yielding enhanced rewards upon successful challenge completion.
Challenge Prioritization Framework
Successfully completing all 40 challenges requires strategic planning and resource allocation. Focus on challenges that overlap naturally with your mapping progression and build capabilities.
Efficiency Optimization: Group challenges by league mechanic and tackle them simultaneously. For example, when running Incursion missions, simultaneously progress Betrayal encounters to maximize time efficiency.
Resource Management: Allocate currency and time based on challenge difficulty and market availability of required items.
For players targeting the full 40/40 completion, we recommend our comprehensive Complete Guide for comprehensive build optimization.
Build Selection: Consider specialized builds for specific challenges. Totem and minion builds excel in Sanctum content due to their ability to deal damage while avoiding enemy attacks.
Mastering your Class Guide selection can dramatically reduce the difficulty of several endgame challenges.
Remember that challenge completion is progressive—many objectives will naturally complete as you engage with the game’s core systems. Regular mapping, efficient league mechanic utilization, and strategic Atlas passive tree allocation form the foundation of successful challenge completion.
Conquering Path of Exile’s most demanding encounters requires precise understanding of each boss’s unique mechanics and the specific conditions you must meet while defeating them.
Wormhole Slam represents a sophisticated two-stage assault from the final Cortex boss, Synthete Masterpiece. He launches dark spheres that forcibly relocate you directly in front of his position, immediately following up with a devastating area attack. While the initial teleportation cannot be avoided, the subsequent slam requires careful timing of your movement abilities. Listen for the auditory cue “Feel the pull of the void” to anticipate this sequence.
Inescapable Doom constitutes a phase where you must activate energy spheres while evading an expanding laser perimeter. This demands both sufficient health pool to withstand incidental laser contact and adequate movement speed for positioning. Since the laser inflicts lightning damage, consider incorporating a Topaz flask into your setup.
Maven’s Punishment functions as a debilitating status that completely nullifies your life regeneration and blocks all forms of life recovery. To acquire this debuff, intentionally contact the rotating laser barriers during the fight’s concluding phase immediately before delivering the final blow.
Volatile Anomalies manifest as large dark orbs that pursue you persistently and generate Vortex effects upon contact. They typically materialize near the arena’s perimeter, making central positioning advantageous. If pursued, employ circular movement patterns while managing other attack patterns simultaneously.
During the Sirus confrontation, Desolation of the Awakener appears as a ground-based hazard that he deploys extensively in the final stage. You must position yourself within one of these zones when executing the killing strike. These effects deliver comprehensive damage across all types—physical, fire, cold, lightning, and chaos. The chaos component proves particularly lethal, necessitating Amethyst flask usage and potentially additional life flasks.
Searing Rune presents as circular tiles that Searing Exarch generates in patterned blocks across the battlefield. Position yourself on one during the final attack execution. Equip a Ruby flask since these obviously inflict substantial fire damage.
Uber Elder presents unique complexity, requiring simultaneous preparation of two distinct environmental effects while maintaining the boss at low health. Eldritch Decay emerges as a ground effect produced by Propagator minions that appear throughout the encounter. If maintained alive sufficiently long, they eventually generate the required effect. Meanwhile, Vortex Ground should already be familiar—this manifestation occurs when the black Vortex spheres reach your location.
Given that only five encounters are required from the available options, strategic prioritization becomes essential for efficient completion. Based on difficulty scaling and access cost analysis, the optimal selection includes Cortex, Searing Exarch, Eater of the World, Maven, and Sirus. The Shaper and Uber Elder alternatives present significantly greater annoyance factors, with Uber Elder particularly expensive to respawn following failed attempts.
Critical Preparation Tips:
- Cortex Defense: Maintain constant awareness of Synthete Masterpiece’s positioning to anticipate Wormhole Slam sequences
- Elemental Mitigation: Customize your flask setup specifically for each boss’s primary damage type
- Movement Skill Mastery: Practice precise timing for dash, flame dash, or leap slam to evade the slam component
- Uber Elder Coordination: Practice managing Propagator minions while controlling boss health percentages
- Economic Considerations: Factor in the substantial cost differences between boss access methods
Advanced Execution Strategy: For Uber Elder specifically, consider bringing a partner to help manage the dual effect requirement
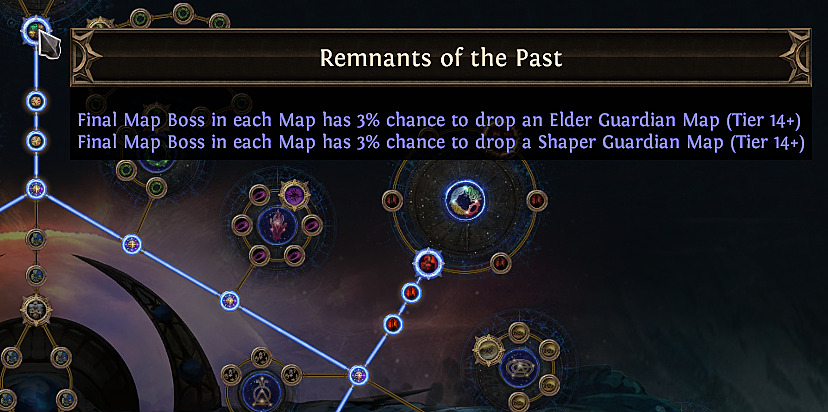
- Open 400 Chests at the end of the Endgame Labyrinth
- Complete 50 Forbidden Sanctum Floors that are area level 81 or higher
- Complete 250 Red Tier Master Missions
- Complete 100 Elder Guardian, Shaper Guardian or Elderslayer Maps
- Defeat 100 Rare Monsters with Pantheon modifiers in Tier 16 Maps
- Guardian Map Farming: Utilize Conquered’s and Shaper’s influence on your Atlas to maximize Guardian map drops.
- Time Management: Allocate specific play sessions focused exclusively on Guardian map completion
- Resource Allocation: Balance your time between targeted farming and general mapping to maintain engagement
- Atlas Passive Allocation: Invest in nodes that increase Guardian map drop chances and provide duplicate map opportunities
- Complete all campaign and introductory league mechanic challenges first for foundation building
- Focus on overlapping challenges during mapping sessions to maximize efficiency
- Utilize Atlas passive tree and scarabs to target specific league mechanics
- Target mid-game challenges with strategic map device mods and sextants
- Plan advanced boss encounters with proper build preparation and mechanic knowledge
- Consider carry services for the most difficult encounters if your build cannot handle them
- Complete all introductory Sanctum challenges first to unlock core mechanics and relic systems
- Systematically work through league-specific encounters (Beyond, Breach, Delirium) using targeted Atlas passives
- Plan boss encounters strategically – prepare specific conditions beforehand rather than attempting randomly
- Utilize specialized farming methods for rare components rather than relying on random drops
- Complete all campaign and early mapping challenges during natural progression
- Specialize Atlas passive tree for targeted league mechanics
- Complete overlapping endgame challenges through efficient mapping strategies
- Tackle conditional boss challenges with optimized builds
- Address the most difficult challenges last, considering carry services if necessary
- Complete all campaign act bosses and unlock Atlas progression
- Focus on Sanctum mechanics early to build relic power
- Utilize Atlas passive tree to enhance specific league mechanics
- Complete 30 Red Tier Master Missions for each league mechanic
- Tackle pinnacle boss challenges with optimized builds or carry services
- Prioritize Cortex, Searing Exarch, Eater, Maven, and Sirus for most efficient completion path
- Acquire and customize specialized flasks: Ruby for Searing Exarch, Amethyst for Sirus, Topaz for Eater of Worlds
- Practice movement skill timing specifically for Cortex’s Wormhole Slam sequence
- Farm 100 Guardian maps using Atlas passive optimization
- Complete 50 Sanctum floors by focusing on first-floor repetition
- Leverage Kirac missions and scouting reports to accelerate progress
Complete any four of these encounters the specified number of times.
This league’s ultimate challenge presents unusually accessible completion requirements. The 250 Red Tier Master missions and rare monsters with Pantheon modifiers will naturally complete through regular endgame mapping activities. This leaves only two additional selections required from the remaining options.
50 Sanctum Floors represents a relatively straightforward objective, as it doesn’t mandate specific floor types. You can repeatedly run the initial floor to accumulate completions more efficiently. This can theoretically be achieved within approximately 400 maps, assuming optimal Sanctum performance metrics.
The fourth recommended selection is 100 Guardian maps. Acquiring these two Notables on your Atlas tree will significantly enhance map acquisition rates, though bulk purchasing remains a viable alternative. Remember that Kirac missions contribute to these totals, so focus on accumulating his scouting reports through regular gameplay.
Optimization Strategies:
Action Checklist
Sanctimonious Skill Challenges
Defeat these specific Forbidden Sanctum floor bosses under specialized conditions while in level 83 areas.
This boss-specific challenge demands precise execution and mechanical understanding. Dodging Varakath’s flamethrower proves manageable by positioning behind him, though maintaining moderate distance prevents burning ground damage.
The dual boss encounter necessitates focused single-target damage on one adversary. Consider skill gem swapping if your primary clearing ability possesses excessive area coverage.
Xenathar’s laser patterns feature clear telegraphing with brief damage windows requiring specific evasion timing rather than continuous avoidance.
Lycia’s Enervation mechanic presents the most demanding requirement. The crimson mist she generates throughout the arena demands constant safe-zone navigation while simultaneously dealing damage and dodging additional abilities. Important clarification: Second phase completion remains unnecessary for this specific challenge objective.
Strategic Approach Optimization
Maximize your challenge completion efficiency through these professional techniques developed through extensive gameplay analysis.
Build Selection Strategy: Prioritize totem, minion, or trap builds for challenging encounters as they allow damage dealing while focusing on survival mechanics.
Resource Management Mastery
Efficient Aureus coin allocation significantly impacts your Sanctum success rate. Merchant rooms typically demand 300-600 coins for significant boon purchases. Advanced tactic: Combine multiple challenge objectives within single runs to minimize time investment and maximize progress simultaneouly.
Time Efficiency Framework
Implement this structured approach to minimize time investment while maximizing challenge progression.
Path of Exile’s latest expansion, The Forbidden Sanctum, introduces a comprehensive set of 40 challenges with tiered rewards. Unlike previous leagues where 40/40 required extreme dedication, this iteration offers a more accessible path to 38 challenges while still providing prestige options for completionists. This guide provides strategic insights to optimize your challenge completion efficiency.
Seasoned players will find the challenge structure thoughtfully designed, with many objectives naturally completing through normal gameplay progression. The key distinction lies in understanding which challenges overlap and can be completed simultaneously versus those requiring dedicated focus.
Pro Tip: Begin with challenges that have natural overlap in your mapping strategy, then systematically address the remaining objectives based on your build capabilities and available resources.
Learning the Ropes
Complete these fundamental tasks to establish your character’s progression foundation:
No reproduction without permission:Game Guides » The Forbidden Sanctum challenge guide completion Path of Exile. PoE 3.20 40/40 challenges analysis Learning the Ropes